
Intravascular Monitoring and Set Up of the Pressure Transducer
A transducer is a device which converts energy from one form to another.
Converts pressure into a change of electrical current.
Signal conditioning and monitoring software converts it into a human-readable waveform
Zeroing" can be defined as "the use of atmospheric pressure as a reference standard against which all other pressures are measured".
The Transducer must be zeroed to remove the effects of atmospheric pressure.
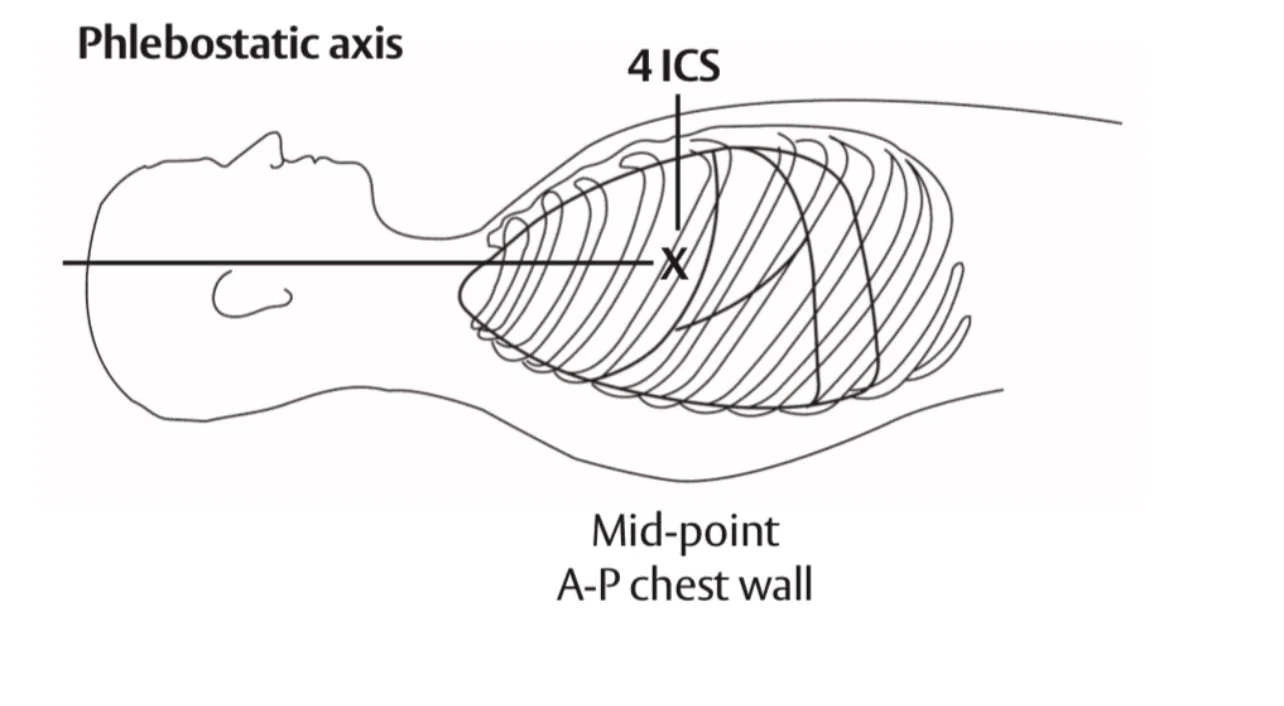
"Leveling" can be defined as "the selection of a position of interest at which the reference standard (zero ) is set" conventionally "levelled" at the phlebostatic axis.
The phlebostatic axis corresponds roughly with the position of the right atrium and aortic root, and this level has generally been accepted as the ideal reference level for measure the pressure of the blood returning to the heart.
The phlebostatic axis is at the 4th intercostal space along the mid axilla line.
FACT: For every 10cm below the phlebostatic axis, the art line will add 7.4mmHg of pressure.
Transducers along with the pressure tubing are usually color coded:
Red = Arterial Line
Blue = Central Venous Pressure Line
Yellow = Pulmonary Artery Line
Preparation:
1. Using aseptic technique remove the transducer from the sterile packaging and ensure that all the connections are secure
2. Insert the transducer into a mounting back plate that is secured on an IV pole
3. De-air the IV bag and prime the transducer system, invert the normal saline IV bag so that air raises to the base of the bag (anticoagulation per institutional policy) spike the IV bag with the fluid administration set keeping the drip chamber upright. Open the roller clamp on the IV set , open the vent port by turning the stopcock toward the patients pressure tubing and away from the transducer while leaving the vented cap in place. While keeping the IV bag inverted gently squeeze air out of the bag with one hand while pulling the snap tab flushing device with the other hand until air is emptied from the IV bag and the dripChamber is filled at least halfway.
4. Gravity prime the transducer system. Insert the IV bag into a pressure infuser bag and hang on an IV pole ( do not inflate yet). Pull the snap tab flushing device to deliver the flush solution through the transducer and out through the vent port’s vented cap. Remove all air bubbles. Close the vent port by turning stop cock toward the cap. Holding the tubing out of 45° angle pull the snap tab to flush through the remainder of the tubing.
5. Fast flash the transducer system. Pressurize the IV flushing solution bag to 300 mmHg. Pull or squeeze the snap tab to flush the tubing under pressure to remove any residual bubbles. Connect the transducer to the bedside monitor cable for calibration.
6. Replace the vented caps on the system with non-vented cap.
Calibration
1. Connect the transducer cable to the monitor cable, Connect the monitor cable to the appropriate slot on the bedside monitor
2. Level the transducer to the patients phelobostatic axis which can be found in the middle of the anterior posterior chest wall at the fourth intercostal space. It is important to maintain the transducer at the phlebostatic axis during all times of monitoring to ensure accurate pressure readings. Transducer must be zeroed to remove the effects of atmospheric pressure.
3. Open the stopcock above the transducer to atmospheric air in the direction away from the transducer towards the pressure bag, then remove the non-vented cap keep the stopcock cap sterile.
4. Select the zero function on the bedside monitor and confirm That the waveform and numeric displays zero.
5. Close the stopcock on the transducer towards the vent port and return the non-vented cap.
6. Connect the tubing below the transducer to the patients catheter. Aspirate the line to ensure no residual bubbles remain confirming patency of the catheter, then flush her system of any residual blood
7. Confirm the appropriate waveform and numeric values are displayed. Perform a square wave test to assess the frequency response of the system. Confirm the pressure channel has the appropriate label, scale alarm settings, and color coding physiologic pressure being measured.
How to prime the intravascular monitoring system
Click or tap HERE
How to calibrate the Transducer
Click or tap HERE
Reference